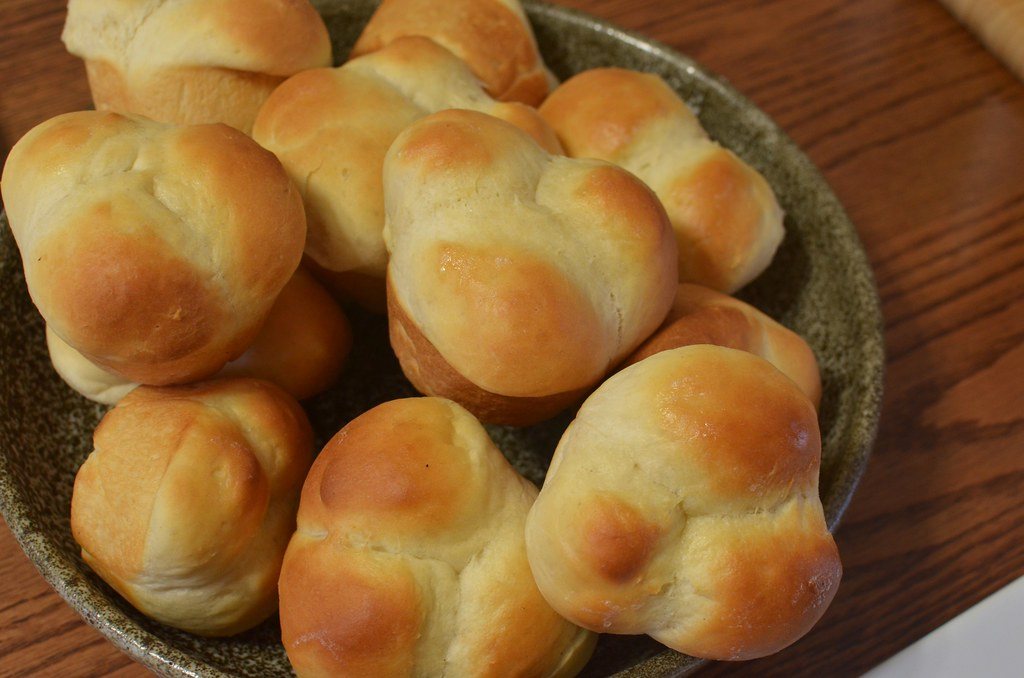
Warm bread on the table makes any meal feel generous, and this dinner rolls recipe delivers rolls that are tall, feathery soft and golden on top. They pull apart in fluffy strands and have just enough sweetness to go with both savoury stews and a simple swipe of butter and jam.
The dough is enriched with milk, egg and butter, which keeps the crumb tender for days. You can knead by hand or in a stand mixer, and with a little planning the rolls can be shaped the night before and baked fresh when guests arrive.
Why These Rolls Are Worth Making
Shop-bought rolls are convenient, but they rarely have this kind of softness or flavour. Homemade rolls also let you control the ingredients, with no preservatives and no long ingredient list. Because they bake together in one tin, the sides stay soft while the tops turn glossy and bronzed, giving you that classic pull-apart look without any special skill.
They are also forgiving. If your dough rises a little slower or faster than expected, the rolls still turn out well, which makes this a great recipe for anyone just starting out with yeast baking.
Ingredient Notes and Swaps
- Bread flour: Its higher protein gives taller, springier rolls. Plain flour works perfectly well and gives a slightly more tender, cakey crumb.
- Whole milk: Adds richness and softness. Semi-skimmed is fine. For a dairy-free version, use unsweetened oat or soy milk and a plant-based butter.
- Egg: Gives structure and colour. To make eggless rolls, replace it with an extra 50 ml milk and brush the tops with milk instead of egg wash.
- Butter: Adding it after some initial kneading lets the gluten develop first, which gives a lighter result.
- Instant yeast: Goes straight into the flour. For active dry yeast, use the same weight and dissolve it in the warm milk first.
Soft Dinner Rolls Recipe: Fluffy, Buttery Pull-Apart Rolls
American · Side Dish · Easy
Ingredients
- 450 g bread flour or plain flour, about 3 2/3 cups
- 7 g instant yeast (2 1/4 tsp)
- 40 g sugar (3 tbsp)
- 1 1/4 tsp salt
- 240 ml whole milk (1 cup), warmed to about 40°C
- 1 large egg, at room temperature
- 55 g unsalted butter (4 tbsp), softened
- For finishing: 1 egg beaten with 1 tbsp milk, and 2 tbsp melted butter
- Flaky salt, optional
Method
- Whisk the flour, yeast, sugar and salt in a large bowl or stand mixer bowl.
- Add the warm milk and egg and mix into a shaggy dough.
- Knead for 5 minutes, add the softened butter a little at a time, then knead 5 to 8 minutes more until smooth, elastic and slightly tacky.
- Cover and let rise in a warm place for 1 to 1 1/2 hours until doubled.
- Grease a 23 x 33 cm (9 x 13 inch) baking tin. Divide the dough into 12 equal pieces of about 65 g and shape into tight balls.
- Arrange in the tin in 3 rows of 4, cover and let rise for 40 to 60 minutes until puffy and touching.
- Heat the oven to 190°C (170°C fan, 375°F). Brush the rolls with egg wash.
- Bake for 18 to 22 minutes until deep golden; the centre should read about 88 to 93°C (190 to 200°F).
- Brush with melted butter straight out of the oven, sprinkle with flaky salt if you like, and cool for 10 minutes before pulling apart.
The Process in Detail
Kneading
This is the stage that makes the biggest difference to texture. The dough starts sticky, especially after the butter goes in, but keep going rather than adding too much flour. It is ready when it is smooth and passes the windowpane test: stretch a small piece thin, and it should become translucent without tearing. In a stand mixer with a dough hook, this takes around eight to ten minutes on medium-low speed.
First Rise
Place the dough in a lightly oiled bowl, turn it to coat and cover. A warm spot around 25 to 28°C is ideal. Avoid very hot places, which can make the dough taste yeasty and over-proof.
Shaping Tight Balls
Weighing the pieces gives even rolls that bake at the same rate. To shape, flatten each piece, fold the edges into the middle, flip it seam side down and roll it under a cupped hand on an unfloured counter. The friction tightens the surface, which helps the rolls rise upward rather than spreading.
Second Rise and Baking
The rolls are ready to bake when they have puffed noticeably, are touching each other and spring back slowly when pressed. Brush gently with egg wash so you do not deflate them. Bake until deeply golden; an instant-read thermometer in the centre roll is the most reliable test.
Baker’s Tips
- Use a kitchen scale for flour. Cup measurements vary and too much flour makes dense rolls.
- Check the milk temperature. Above about 50°C it can harm the yeast.
- If the tops brown too quickly, loosely cover with foil for the last five minutes.
- A metal tin gives better browning than glass or ceramic.
- Let the rolls cool for ten minutes before tearing them apart. The crumb is still setting when they first come out, and cutting too early can make them seem gummy.
Flavour Variations
Turn this dinner rolls recipe into garlic herb rolls by brushing them after baking with butter mixed with crushed garlic, parsley and a pinch of salt. For cheesy rolls, tuck a cube of cheddar inside each ball while shaping. Sesame or nigella rolls get a sprinkle of seeds on top of the egg wash. For a slightly sweet honey butter finish, mix two tablespoons of melted butter with one tablespoon of honey and brush on while hot.
Serving, Storing and Making Ahead
Serve the rolls warm with soups, stews, roast chicken, nihari or a festive dinner. They also make excellent mini sandwiches with leftover tikka or shredded chicken.
Storing: Keep cooled rolls in an airtight container or bag at room temperature for up to three days. Rewarm in a 160°C oven for five to eight minutes, loosely covered with foil.
Freezing: Freeze baked and cooled rolls in a sealed bag for up to three months. Thaw at room temperature, then rewarm.
Overnight method: After shaping, cover the tin tightly and refrigerate for up to 18 hours. The next day, let the rolls sit at room temperature for about an hour until puffy, then bake as normal.
Common Questions
Why are my rolls dense?
Dense rolls usually come from too much flour, under-kneading or under-proofing. Weigh the flour, knead until the dough is smooth and elastic, and let the rolls rise until visibly puffy.
Can I make this dinner rolls recipe without a mixer?
Absolutely. Hand kneading takes about twelve to fifteen minutes. A slightly sticky dough is fine; use a bench scraper to help.
Can I bake these rolls in a round tin?
Yes. Two 20 cm round tins hold six rolls each, or one 25 cm round tin holds all twelve snugly. Baking time stays about the same.
How can I make the tops shinier?
Use egg wash before baking and brush with melted butter right after. The combination gives a glossy, golden finish.
Can I use whole wheat flour?
You can replace up to a third of the flour with whole wheat flour or fine atta. Add an extra tablespoon or two of milk, since whole grain flour absorbs more liquid, and expect slightly less height with a nuttier flavour.
Bake a Batch This Week
Once you have tried this dinner rolls recipe, it is hard to go back to bagged bread. Bake a tray for your next family meal, and keep a few in the freezer for days when you want something warm and homemade with very little effort.