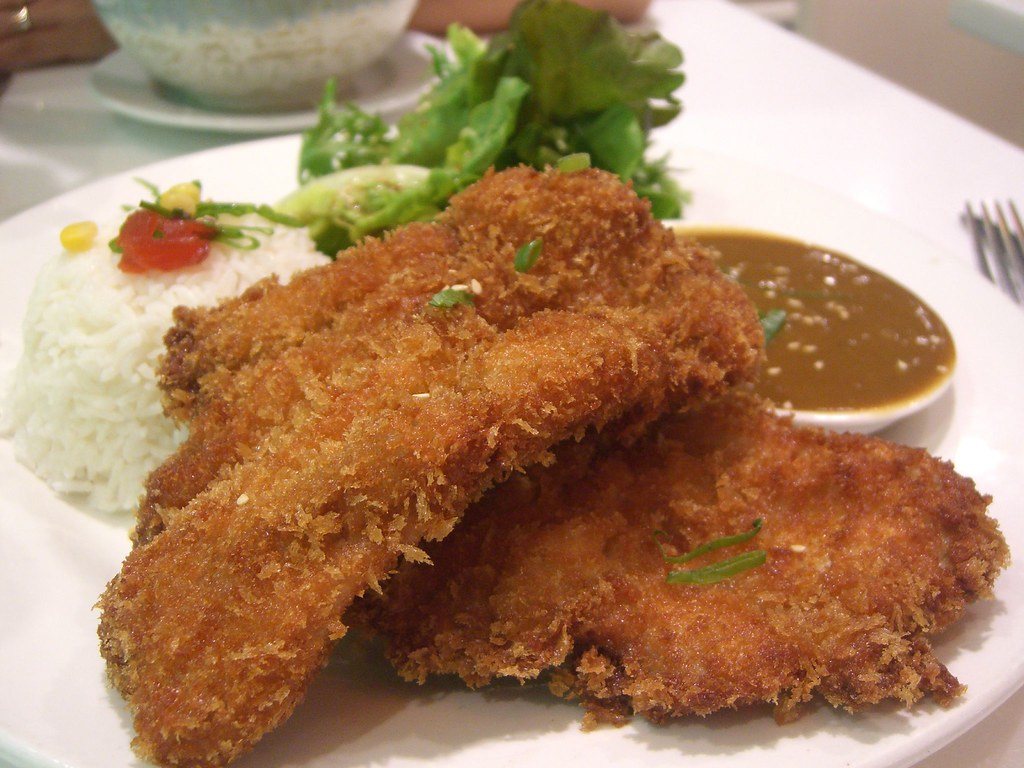
A plate of chicken katsu curry is pure comfort: a shatteringly crisp cutlet, a mound of sticky rice and a pool of thick, gently spiced sauce that is more sweet and savoury than fiery. It is one of the most loved dishes in Japanese home cooking, and once you make it yourself you will see why it has become a favourite far beyond Japan.
This version skips the boxed roux blocks and builds the sauce from a simple butter-and-flour base, slow-cooked onions, curry powder and a grated apple for that signature mellow sweetness. The chicken is coated in panko and shallow fried, so you get serious crunch without a deep fryer.
Why You’ll Love This Recipe
- No special shopping. Everything comes from a normal supermarket; no curry roux blocks needed.
- Mild and family friendly. The sauce is warm rather than hot, so children usually love it.
- Two textures in one bowl. Crunchy coating against silky sauce is what makes katsu so satisfying.
- Make-ahead friendly. The sauce tastes even better the next day, so you can split the work.
Key Ingredients and Smart Swaps
- Chicken breast or thigh: Breast gives neat, classic slices; thigh stays juicier and is more forgiving. Either works as long as it is pounded to an even thickness.
- Panko breadcrumbs: These large, airy Japanese crumbs are what make the coating light and crackly. Ordinary dried breadcrumbs work in a pinch but fry denser and darker.
- Curry powder: Use a mild, all-purpose blend. Japanese-style powders exist, but a standard mild powder plus a little garam masala tastes very close.
- Apple: Grated apple melts into the sauce and adds a gentle fruitiness. A spoon of apple sauce or a little mango chutney does a similar job.
- Soy sauce and ketchup: Small amounts add depth, saltiness and a touch of tang that rounds everything out.
- Short-grain rice: Its slightly sticky texture holds the sauce well. Basmati is fine if that is what you have, though it will be looser.
Chicken Katsu Curry Recipe: Crispy Japanese Comfort at Home
Japanese · Main Course · Medium
Ingredients
- 2 large boneless chicken breasts (about 500 g), or 4 boneless thighs
- 1/2 tsp salt and 1/4 tsp black pepper
- 40 g (1/3 cup) plain flour
- 2 eggs, beaten
- 80 g (1 1/2 cups) panko breadcrumbs
- Neutral oil for shallow frying (about 250 ml)
- 2 tbsp butter
- 1 large onion, thinly sliced
- 2 garlic cloves and 2 cm ginger, grated
- 1 large carrot, cut into chunks
- 1 medium potato, peeled and cut into chunks
- 2 tbsp plain flour (for the sauce)
- 1 1/2 tbsp mild curry powder
- 1 tsp garam masala
- 700 ml (3 cups) chicken stock
- 1 small apple, grated
- 1 tbsp soy sauce
- 1 tbsp tomato ketchup
- 1 tsp honey or sugar
- 300 g (1 1/2 cups) Japanese short-grain rice, cooked, to serve
- Pickled ginger or sliced spring onion, to garnish
Method
- Melt the butter in a saucepan over medium-low heat. Add the onion and cook for 12 to 15 minutes, stirring often, until soft and golden.
- Stir in the garlic and ginger for 1 minute, then add the 2 tbsp flour, curry powder and garam masala. Cook, stirring, for 2 minutes until fragrant.
- Gradually whisk in the stock until smooth. Add the carrot, potato, grated apple, soy sauce, ketchup and honey.
- Simmer gently, partly covered, for 20 to 25 minutes until the vegetables are tender and the sauce coats a spoon. Season to taste.
- Meanwhile, slice each chicken breast in half horizontally and pound to an even 1.5 cm thickness. Season with salt and pepper.
- Dredge each piece in flour, dip in beaten egg, then press firmly into panko on both sides.
- Heat 1 cm of oil in a frying pan to about 170°C (340°F). Fry the chicken for 3 to 4 minutes per side until deep golden and the centre reaches 74°C (165°F).
- Drain on a rack for 2 minutes, then slice into strips.
- Spoon rice onto plates, ladle curry sauce alongside, and lay the sliced katsu on top. Garnish and serve straight away.
Step-by-Step Guide
Build the sauce base first
Start the sauce before you touch the chicken, because it needs time to simmer. The secret is patience with the onions. Cook them slowly in butter until they are soft and golden, not just translucent. That sweetness becomes the backbone of the sauce, so do not rush it with high heat.
Once the garlic and ginger go in, sprinkle over the flour and spices and keep stirring for a couple of minutes. This cooks out the raw flour taste and toasts the curry powder so it smells nutty rather than dusty.
Add stock gradually
Pour the stock in a little at a time, whisking as you go, and you will avoid lumps entirely. Then add the vegetables, apple and seasonings and let the pot bubble gently. The potato releases starch as it cooks, which naturally thickens the sauce to that classic glossy, spoon-coating consistency. If you prefer a perfectly smooth sauce, blend half of it and stir it back in.
Prepare the cutlets
While the sauce simmers, butterfly or slice the chicken and pound it to an even thickness. Even cutlets cook at the same speed, so the coating does not burn before the middle is done. Set up three shallow dishes for flour, egg and panko, and use one hand for dry and one for wet to keep your fingers from turning into crumb clubs.
Fry with steady heat
Heat the oil until a crumb sizzles immediately. Lay the cutlets in away from you and leave them alone for the first few minutes so the crust sets. Flip once. Check the thickest part with a thermometer: chicken is safe at 74°C (165°F). Rest the pieces on a wire rack rather than paper, which traps steam and softens the bottom.
Tips for the Best Results
- Press the panko on firmly. A loose coating falls off in the pan.
- Chill the breaded cutlets for 10 minutes before frying if you have time; the coating clings better.
- Fry in batches so the oil temperature stays steady. Crowding leads to greasy, pale katsu.
- Slice the chicken with a sharp knife in one firm stroke to keep the crust intact.
- Make the sauce thick enough to coat a spoon; a watery sauce is the most common reason homemade chicken katsu curry disappoints.
- Serve the sauce beside or under the cutlet, not poured over the top, so the crunch survives to the table.
Variations to Try
Pork katsu (tonkatsu): Use boneless pork loin steaks, which is how the dish is often served in Japan. Vegetable katsu: Coat thick slices of aubergine, sweet potato or firm tofu instead of chicken. Oven-baked: Toss the panko in a tablespoon of oil, coat the chicken and bake on a rack at 220°C (425°F) for about 20 minutes, turning once, until it reaches 74°C inside. Spicier sauce: Add a pinch of chilli powder or a chopped green chilli with the garlic if you like more heat.
Serving, Storage and Reheating
The classic plate is simple: rice, sauce and sliced cutlet, with a little pickled ginger or bright red pickles for contrast. A heap of finely shredded cabbage dressed with rice vinegar adds freshness and crunch. For a fuller meal, add miso soup or a quick cucumber salad with sesame seeds.
Leftover chicken katsu curry keeps well if you store it smartly:
| Component | Fridge | Freezer | Reheat |
|---|---|---|---|
| Curry sauce | Up to 4 days | Up to 3 months | Gently on the hob, adding a splash of water |
| Fried katsu | Up to 2 days | Up to 2 months | Oven or air fryer at 200°C until hot through |
| Cooked rice | 1 day, cooled quickly | Up to 1 month | Microwave, covered, until steaming hot |
Store the cutlets and sauce separately, and never microwave the katsu if you want to keep any crunch.
Frequently Asked Questions
Is chicken katsu curry spicy?
Not usually. Japanese curry is known for being mild and slightly sweet. You can easily add heat with chilli, but the traditional style is gentle.
Can I use store-bought curry roux blocks?
Yes. Replace the flour, curry powder and garam masala with the roux, adding it at the end of simmering and stirring until it dissolves. Check the seasoning, as the blocks are already salty.
Why did my coating fall off?
Usually the chicken was wet, the panko was not pressed on firmly, or the pieces were moved too early in the pan. Pat the meat dry and let the crust set before flipping.
Can I make it halal?
Absolutely. Use halal chicken and a halal-certified stock; nothing else in the recipe needs changing.
Final Word
Once you have made chicken katsu curry from scratch, the takeaway version may start to feel a little ordinary. Make the sauce ahead, bread the chicken while the rice cooks, and dinner comes together with very little stress and a lot of crunch.